Diferència entre revisions de la pàgina «Accés amb clau»
Salta a la navegació
Salta a la cerca
(Es crea la pàgina amb «== Introducció == Fent servir la '''matriu de botons''', un parell de '''LEDs''' i un '''buzzer''', es pot program...».) |
(Foto fritzing) |
||
| Línia 1: | Línia 1: | ||
== Introducció == | == Introducció == | ||
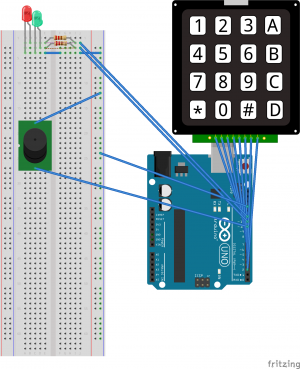
| + | [[Fitxer:Teclado_Numerico_Fritzing.png|thumb|Esquema visual de connexió]] | ||
Fent servir la '''[[Boto#Matriu_de_botons|matriu de botons]]''', un parell de '''[[LED|LEDs]]''' i un '''[[Buzzer#Passiu|buzzer]]''', es pot programar un accés per clau. | Fent servir la '''[[Boto#Matriu_de_botons|matriu de botons]]''', un parell de '''[[LED|LEDs]]''' i un '''[[Buzzer#Passiu|buzzer]]''', es pot programar un accés per clau. | ||
Revisió de 11:01, 27 maig 2016
Introducció
Fent servir la matriu de botons, un parell de LEDs i un buzzer, es pot programar un accés per clau.
Procediment
En el moment d'arrencar, s'inicialitza la matriu de botons. Hi ha una clau fixa (1234), l'usuari va prement botons i el resultat s'emmagatzema en una variable numèrica, convertint els caràcters que configurarem en la matriu a números. Limitem la recollida de botons a 4. En el moment que ja ha acabat, es comprova si el número final coincideix amb la nostra clau, i activa una funció o una altra.
Codi
#include <Keypad.h>

const byte numRows = 4; //number of rows on the keypad
const byte numCols = 4; //number of columns on the keypad

//keymap defines the key pressed according to the row and columns just as appears on the keypad
char keymap[numRows][numCols] =
{
  {'1', '2', '3', 'A'},
  {'4', '5', '6', 'B'},
  {'7', '8', '9', 'C'},
  {'*', '0', '#', 'D'}
};

//Code that shows the the keypad connections to the arduino terminals
byte rowPins[numRows] = {9, 8, 7, 6}; //Rows 0 to 3
byte colPins[numCols] = {5, 4, 3, 2}; //Columns 0 to 3

//initializes an instance of the Keypad class
Keypad myKeypad = Keypad(makeKeymap(keymap), rowPins, colPins, numRows, numCols);

void setup()
{
  Serial.begin(9600);
  pinMode(10, OUTPUT); // Green LED
  pinMode(11, OUTPUT); // Red LED
  pinMode(12, OUTPUT); // Speaker
}

void led(int l) {
  digitalWrite(10, LOW);
  digitalWrite(11, LOW);
  digitalWrite(l, HIGH);
}

void sound(int freq) {
  int r;
  for (r = 0; r < 20; r++) {
    digitalWrite(12, HIGH);
    delayMicroseconds(freq);
    digitalWrite(12, LOW);
    delayMicroseconds(freq);
  }
}

void loop()
{
  int password = 1234;
  int input = 0;
  int pos = 0;
  int i;

  // For loop does not work, as getKey is working continuously, and it would skip that loop.
  while (pos < 4) {
    //If key is pressed, this key is stored in 'keey' variable
    char key = myKeypad.getKey();
    if (key != NO_KEY)
    {
      Serial.print(key);

      input = (input * 10) + (key - 48);

      led(11);
      sound(400);
      led(0);

      pos++;
    }
  }

  delay(300);

  if (password == input) {
    led(10); // OK!
    for (i = 0; i < 15; i++) {
      sound(200); // (200 * 20) * 15
    }
  } else {
    led(11); // Error.
    for (i = 0; i < 2; i++) {
      sound(3000); // (3000 * 20) * 2
    }
  }

  led(0);

  Serial.println("");
}
